In order to accept payments with Stripe and Paypal, you need your own secure server for processing payment requests. Fortunately, you can build this for free and within a few minutes, with Heroku. Create a free Heroku , Stripe , and Brain tree (For Paypal) account if you don’t have one already. After creating a stripe account, you should get the essential keys For test and production mode. stripe API keys.
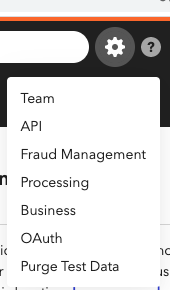
For Paypal, to get your necessary credentials, click on the gear icon at the top right of your profile then click API.
1. Download the “instamobile-payments-server” app here.
2. In the downloaded project, open “.env” and update it with your Stripe keys and Paypal keys
- Note: Make sure you open .env file using a Terminal, the file won’t be visible in Finder / Window Explorer. (e.g. run this command: open .env)
3. Deploy a Middleware To Heroku To Use Stripe Payment.
First make sure you have Git and Heroku command installed.
5. Now you have Heroku and Git installed.
Before you can deploy your middleware app to Heroku, you need to initialize a local Git repository and commit your application code to it.
– The following example demonstrates how to initialize a Git repository for your middleware app: stripeServer, that lives in the stripeServer directory: One after the other, Run command:
cd stripeServer
git init
git add .
git commit -m "My first commit"
“NOTE: Be sure to initialize the Git repository in your app’s root directory. If your app is in a subdirectory of your repository, it won’t run when it is pushed to Heroku.” 6. Next, Create a Heroku remote. “NOTE: You should note that the command bellow will prompt you to press any key to open a browser where you will be required to enter your Heroku account details” Run command:
heroku create
You should then get a new link for your middleware app on Heroku. The link should look something like this: “https://xxxxx-xxxx-xxxxx.herokuapp.com/“ copy this link somewhere. Open “src/ShopertinoConfig.js” (or src/VendorAppConfig.js depending on which app you are installing) and update the Stripe URL with the copied link there. 7. Next, confirm that a remote named Heroku has been set for your app.
Run Command:
git remote -v
Finally, Deploying your code. Run Command:
git push heroku master
And that is all. You have your middleware app on Heroku now.