When you run the app in the original unmodified version of our UberEats React Native clone, you’ll notice that the user experience is that of your customers – they can view restaurants, food items and place orders. Our UberEats Clone also includes the Restaurant Owner App, which allows the restaurant managers to process orders that are coming into their restaurants via the app.
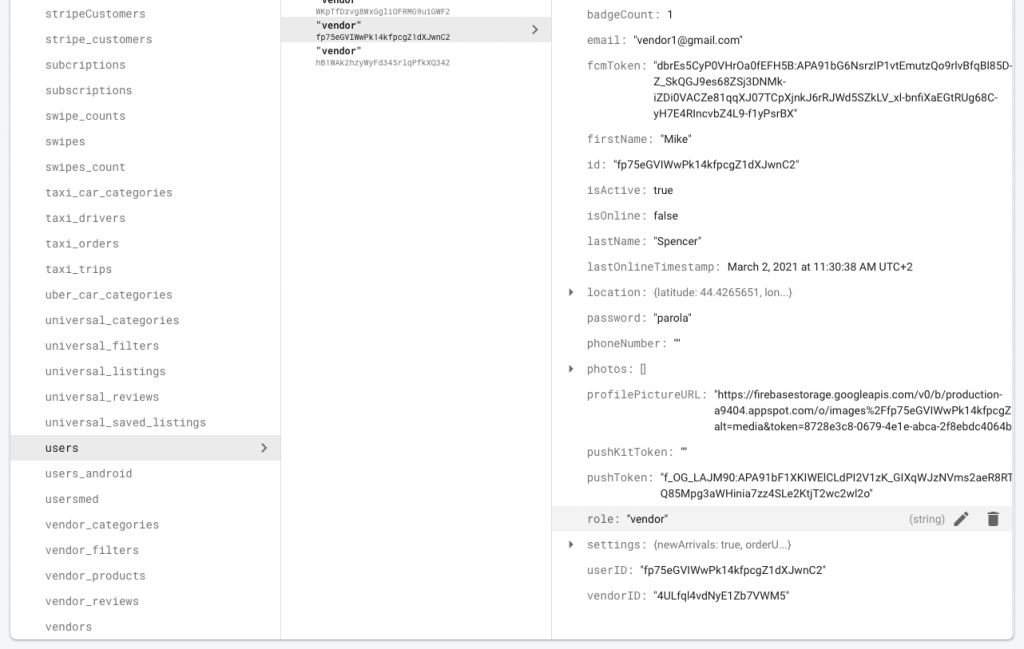
To build and run the Restaurant Manager navigation stack, you need to configure the user role in Firestore, by setting up the role as “vendor” (string type). So go to Firestore, select the “users” collection, find the user that you want to set as a restaurant manager, and add a field named “role” (with value “vendor“):
 Now re-run the app, and you’ll notice you get the restaurant owner experience. Log into the app with a restaurant owner (so an account that has the vendorID field set in the users table, per the documentation here), and you’ll be starting to get order history for that restaurant.
Note: When building the restaurant app with the change above, you’ll notice that the customer app will get overridden on your device by the restaurant app. This is because you are using the same Bundle ID (app identifier) for both apps.
To create a completely separate/different app, you’ll need to do the following steps:
1. Clone the Project, by copy-pasting a duplicate folder of the source code
2. Rename that folder to RestaurantApp and re-configure RestaurantApp as pictured below
3. Set up a new app in Firebase (one for iOS and one for Android), with a different BundleID for iOS (e.g. io.instamobile.restaurant.app.ios) and different applicationId for Android (e.g. io.instamobile.restaurant.app.android). DO NOT change the package name!
4. Set up Firebase on this new folder by following all the steps here (basically override the new GoogleService-Info.plist and google-services.json files)
5. Make sure you modify the Bundle ID and the applicationId in RestaurantApp (make sure these IDs match the Firebase app IDs you created at step 3)
6. Customize RestaurantApp, by changing name, logo, splash screens, etc. See this documentation on how to achieve these things, if you don’t know React Native
7. Build and run the app (RestaurantApp) – now you’ll notice this will create a new app on your device, leaving the customer app untouched, so you can start using both apps at the same time.
Code Pointers
The app selects the correct navigation stack automatically (driver, restaurant manager, consumer or admin), based on the user’s role. This happens in AppNavigation.js:
{currentUser?.role === 'vendor' ? (
  <RootStack.Screen
    options={{ headerShown: false }}
    name="MainStack"
    component={VendorDrawerStack}
  />
) : currentUser?.role === 'driver' ? (
  <RootStack.Screen
    options={{ headerShown: false }}
    name="MainStack"
    component={DriverDrawerStack}
  />
) : currentUser?.role === 'admin' ? (
  <RootStack.Screen
    options={{ headerShown: false }}
    name="MainStack"
    component={AdminDrawerStack}
  />
) : (
  <RootStack.Screen
    options={{ headerShown: false }}
    name="MainStack"
    component={DrawerStack}
  />
)}