React Native Chat Application
At Instamobile, we’re building a ton of complex features to save time and energy for React Native developers across the world. One of these complex features is the chat functionality, which is a must have in almost all mobile apps nowadays. In this tutorial, we’ll learn how to add a React Native Chat into any mobile app with only a few lines of code. And yes, we are talking about a fully fledged chat function, that comes integrated with backend (database & storage) and that is real-time. And it can be integrated into any React Native app with no effort!
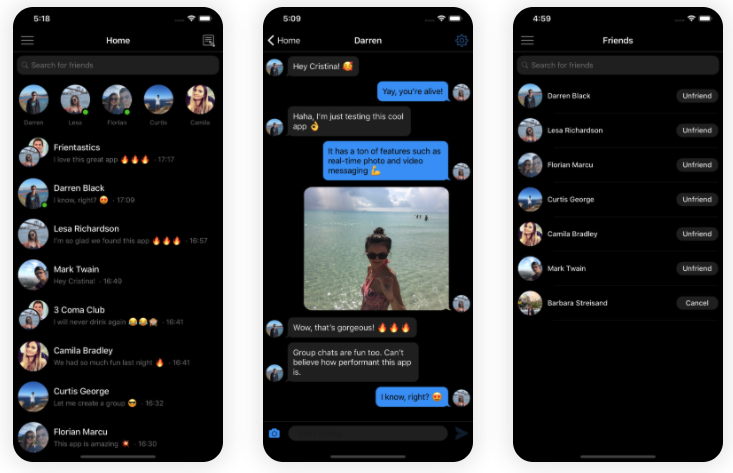
Building a chat feature is extremely complex, even though it might seem trivial at first. Supporting only basic text chat features will make your app look unprofessional and users will be extremely disappointed if they don’t have functions such as sending videos, recording messages, etc. Here’s a list of features that every React Native Chat app should have, and that are never considered in all those tutorials that teach you how to build a chat app in 10 minutes:
-
Photo & Video Messages
-
Audio Messages
-
Sending multiple photos/videos at once
-
Video Player
-
Clickable URLs
-
Full screen photo viewer
-
Typing indicators
-
Seen Status
-
Online Status
-
Group Chats
-
Push Notifications
-
Dark Mode
-
RTL & Localization
-
Blocking users (required by Apple)
The list continues on and on, trust me! We’ve developed our fully fledged React Native chat over the course of 6 months, and it still doesn’t have all the functionalities we’d want. So no, you can’t build a React Native chat app in 10 minutes, if you start from scratch. Fortunately, our code at Instamobile is highly modular, so we made it extremely easy for our customers to integrate the chat functionality into any React Native app in a matter of minutes. And this is applicable to any mobile app, regardless of the backend system they’re using. The magic lives in the IMChatScreen component. This component only needs a channel as its input, wrapping two user IDs, and it will enable the fully functional React Native chat feature when presented on the screen. We are going to present the steps that you need to follow in order to properly display the chat screen between two given users.
1. Link Your App to Your Firebase Account
All messages get stored in Firebase Firestore (a database), regardless of your existing backend, which can be of any kind (AWS, MySQL, REST API, GraphQL, etc). You only need two user IDs in order to trigger the chat functionality properly and we’ll show you how to make things work correctly. In addition to the messages, the chat will also store the blocked users in Firestore. This is a functionality that is required by Apple’s guidelines, and you wouldn’t be able to publish your iOS app without it. If you are not familiar with Firebase already, here what you need to do (check out our comprehensive documentation if you need more details):
-
Create a new Firebase account, a new project and add a new app to the project
-
Add react-native-firebase dependency to your app
npm install [email protected]
- iOS
-
Download the GoogleService-Info.plist file (for iOS) and place it in the main ios/NameOfApp folder (the folder where the Podfile lives in)
-
In Xcode, add this new file to the project in the left panel navigator
-
In the AppDelegate.m, add the following code #import <Firebase.h> [FIRApp configure]; // first line of didFinishLaunchingWithOptions method
-
#import <Firebase.h>
[FIRApp configure]; // first line of didFinishLaunchingWithOptions method
- Android
- Download the google-services.json file (for Android), and place it in the android/app folder
Now run your app and make sure everything works fine.
Mega Bundle Sale is ON! Get ALL of our React Native codebases at 90% OFF discount 🔥
Get the Mega Bundle2. Add Core/chat folder into Your React Native App
All the code that’s related to chatting lives in the Core/chat module. As a fun fact, all of our app templates are using this code to enable the chat functionalities. Simply copy paste this folder into your src folder and you’re done. Additionally, you might want to copy paste CoreAssets and Translations folders as well, if you want to use our own localization library as well as our own icons.
3. Add a Navigation Path to IMChatScreen
The IMChatScreen is the component that’s in charge with the React Native chat functionality. It’s the entry point of every single feature that we listed on our product page. It displays the UI, it hooks up to the backend, it listens for new messages, it displays the photo & video pickers, it manages the typing indicators, etc. So in order to add the chat functionality into your React Native app, you need to make your app able to present this screen. We’re going to assume you are using react-navigation library to handle screen transitions. So simply add this screen (IMChatScreen) to one of your navigators. IMChatScreen lives in src/Core/chat. So you can import it like this
import { IMChatScreen } from "../Core/chat";
Here’s an example of how your route to the IMChatScreen can look like in a stack navigator:
const HomeStack = createStackNavigator(
  {
    Home: { screen: HomeScreen },
    ChatScreen: { screen: IMChatScreen },
  },
  {
    initialRouteName: "Home",
    initialRouteParams: {
      appStyles: AppStyles,
    },
  }
);
4. Display the Chat Screen
Now that everything is properly set up, you can go ahead and present a chat screen anywhere in your React Native app, by simply navigating to the ChatScreen route. Here’s how you can simply present a chat screen between two users, with user IDs as unique identifiers for those users:
import { IMChatScreen } from '../Core/chat';
...
const id1 = "1234";
const id2 = "5678";
const otherUsers = [
   {
       id: id1 < id2 ? id1 + id2 : id2 + id1,
       firstName: "Andrew"
   }
];
const channel = {
    id: id1 + id2,
    participants: otherUsers,
};
props.navigation.navigate('ChatScreen', {
    channel,
    appStyles: AppStyles,
});
Mega Bundle Sale is ON! Get ALL of our React Native codebases at 90% OFF discount 🔥
Get the Mega BundleThat’s it. That’s all you need to present a chat functionality into your own React Native app. Here are a few observations:
-
The code will present a chat between the current user (with id = 1234) and another user (with id = 5678)
-
The channel ID is always the concatenation of the two user IDs, in alphabetical order (so both users will have the exact same channel ID when talking between each other)
-
As you can see, we assumed there’s a “ChatScreen” navigation path already integrated in one of your navigators (stack navigators, bottom navigators, etc.) – so make sure you add this navigation path to your app prior to testing the chat.
-
All the data will be stored in Firebase Firestore, regardless of what other backend you are using. So make sure you set up your Firebase account prior to testing this code. And yes, it works in addition to your existing backend, which can be of any kind (AWS, REST API, WordPress, MySQL, etc)
-
For group chats, the channel ID will simply be the channel ID of the group that you want to present the chat screen for.
-
You can customize the AppStyles as you with, to get the right colors and fonts that match with the UI of your app
-
Reporting & Blocking users will also work right out of the box, regardless of your backend of choice. They will be stored in the “reports” table in Firestore.
5. Test Your Integration
You can go ahead and start chatting between two users. Of course, you’ll test that the functionality works properly. You can also go into your Firebase Console and check out the Firestore tables that got created automatically:
-
channels – this is used for storing all the messages, together with their meta data
-
channel_participations – this is storing the association between chat rooms and users, and it’s extremely important for group chats
-
reports – this table is used for recording all the users that get blocked or reported.
Looking for a custom mobile application?
Our team of expert mobile developers can help you build a custom mobile app that meets your specific needs.
Get in TouchConclusion
Building a React Native chat from scratch is extremely painful. The features are very complex, performance is extremely critical and hard to get right, and the total development work needed will expand over the course of more than 6 months. Additionally, users are extremely picky nowadays, and have high expectations when it comes to chat rooms, so the amount of features needed for a reasonable chat functionality is also very high. Fortunately, at Instamobile, we’ve built a modular chat functionality, that can be integrated into any React Native app easily. Hopefully this tutorial will help all of our clients to easily add chat room to their apps. Please let us know in the comments if you get stuck or if anything is missing from this React Native chat tutorial. Cheers!
Next Steps
Now that you have learned about resources to learn React Native development, here are some other topics you can look into
-
Firebase — Push notifications | Firebase storage
-
How To in React Native — WebView | Gradient| Camera| Adding GIF| Google Maps | Redux | Debugging | Hooks| Dark mode | Deep-link | GraphQL | AsyncStorage | Offline |Chart | Walkthrough | Geolocation | Tinder swipe | App icon | REST API
-
Authentication — Google Login| Facebook login | Phone Auth |
-
Best Resource – App idea | Podcast | Newsletter| App template
If you need a base to start your next React Native app, you can make your next awesome app using manyReact Native template.