
In this tutorial, we are going to learn how to send push notifications to React Native using Firebase. We are going to walk you through all the Firebase setup steps as well as the React Native code needed for sending notifications. Push notifications are an important user retention lever, so React Native developers run into implementing them with every single app they build.  A push notification is a message that pops up on a mobile device to notify a user that a specific action has occurred in a given mobile app. Push notifications can be referred to as a communication channel built into every mobile device today. Push notifications enable apps to reach out to users with short messages that users may respond to. Push notifications look like SMS text messages and mobile alerts, but they only reach users who have installed your app. Each mobile platform has support for push notifications — iOS, Android, Fire OS, Windows and BlackBerry. But all have their own services. In this tutorial, you will learn how to send Android push notifications with FCM (Firebase Cloud Messaging) and React Native. FCM is a cross-platform cloud solution for messages and notifications for Android, iOS, and web applications, which currently can be used at no cost. You will also get to learn a few other important things that you can implement in your own React Native project later on. In this React Native tutorial, we will mainly perform these three tasks:
- Setup a push notifications sample project with react-native-firebase-starter
- Store push tokens into Firebase Real-time Database
- Triggering push notifications with FCM, using Firebase Cloud Functions to query the stored push token
We are going to hardcode a lot of values and strings, just to show you the basic process that makes push notifications work. If you want to get the full source code rightaway, check out our fully functional React Native Video Chat app.
How Do Push Notifications Work?
First of all, we need to identify the users, by sending a request to ask for push permissions. The request is verified by FCM, which replies back with a token (called “push token“). Then, we need to store the flagship push token on the server side, which is Firebase Real-time Database, for this tutorial. You can get the knowledge from the visual flowchart below: 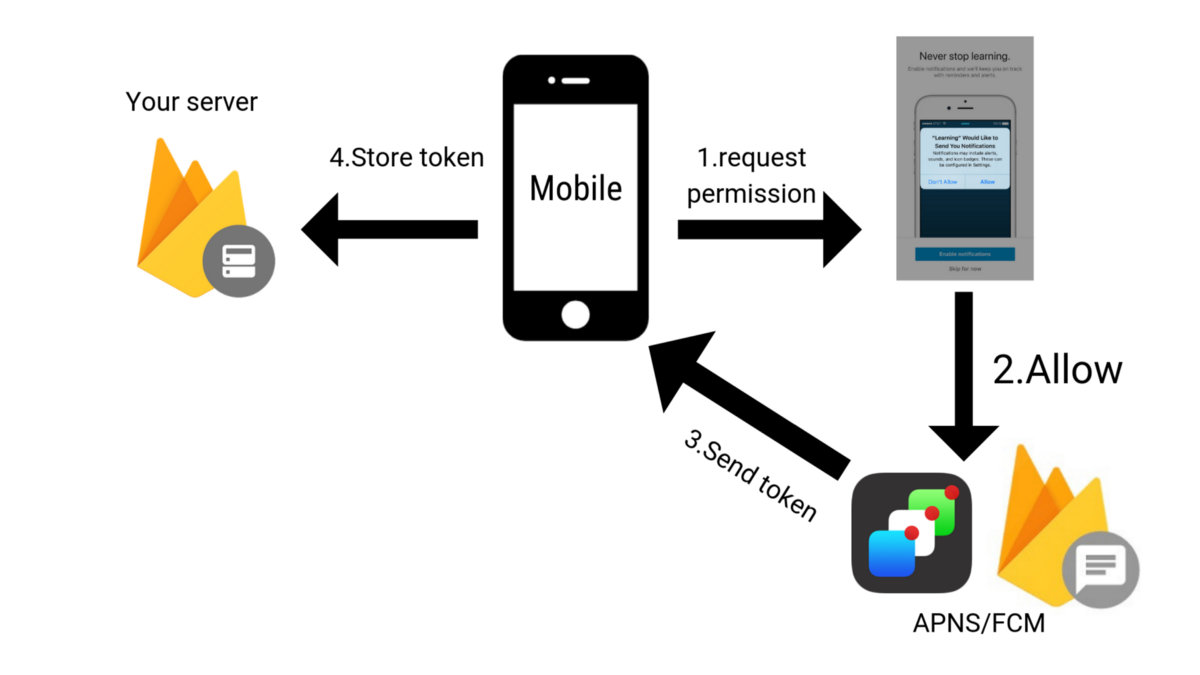
Triggering Push Notifications with Firebase Cloud Functions
Once we have a push token for a given user, we use a Firebase cloud function to trigger push notifications, which in practice is an alternative to our own server. 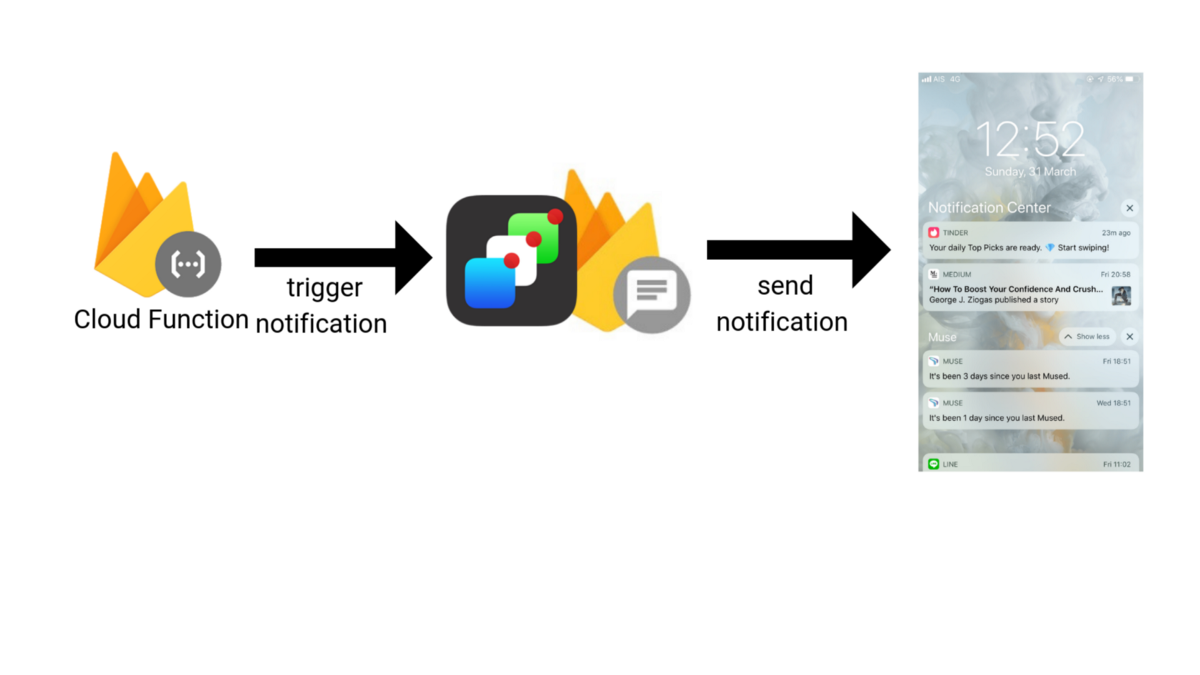
The two screenshots from above illustrate the exact data flow necessary to trigger push notifications in React Native using Firebase. Now that we have a high-level overview of what needs to be done in order to trigger push notifications in React Native using Firebase, let’s get to work. We’ll try to implement a scenario where we fetch the push token for a given user, by requesting their permissions, and then we’ll send a push notifications to welcome them into the app, using a Firebase Cloud function.
Setup Push Notifications with React Native Firebase package
In this step, we’re setting up push notifications support in our React Native project using react-native-firebase package. react-native-firebase is a well-tested modular package that allows mobile developers to integrate the Firebase SDK. It supports both iOS & Android platforms, with over 20 Firebase services. They also provide a ready-made starter boilerplate template for us, so that it becomes easy to set up the whole project. However, we need to configure the starter template to generate a google-service.json file from our own Firebase Console. The first step here is to clone react native firebase stater template using the following command in your git initialized directory:
git clone https://github.com/invertase/react-native-firebase-starter pushdemo
After that, we need to follow the additional setup to generate the Google service file from Firebase console and add it to the folder android/app. Now, head over to Firebase console and create a new project as shown in the screenshot below: 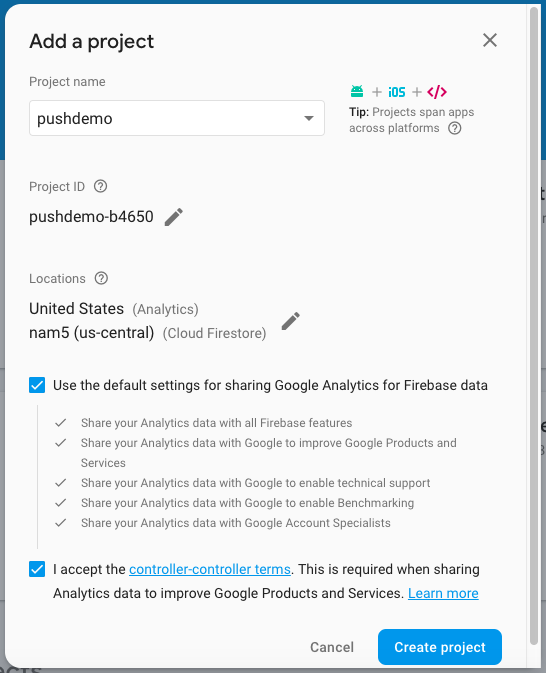
Once the new project is created, select the Android app and open MainApplication.java in your IDE. There we’ll see an imported package named com.invertase.rnfirebasestarted. We need to copy com.invertase.rnfirebasestarter and paste it into the Firebase console, as shown in the screenshot below: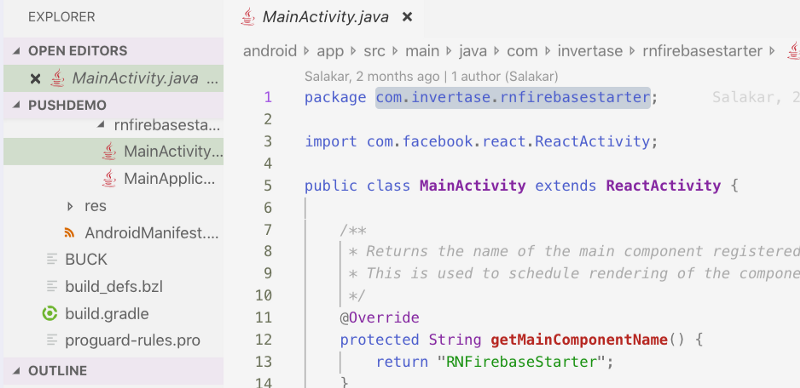
Follow the guiding points in the screenshots and download the google-services.json file into our project folder: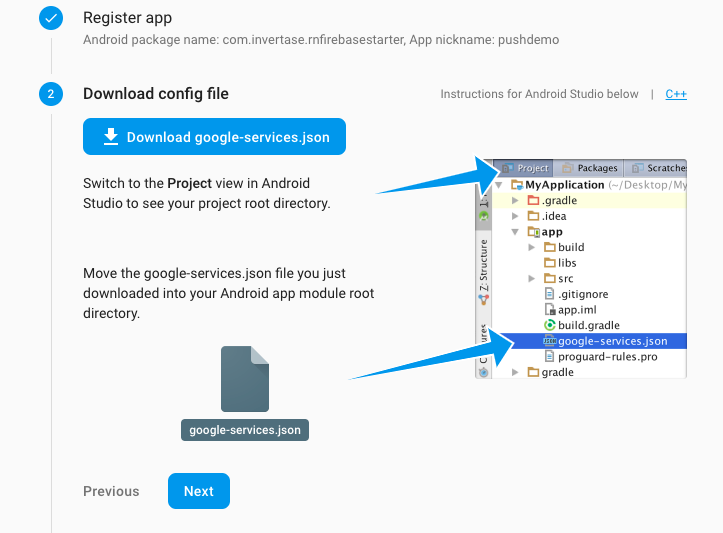
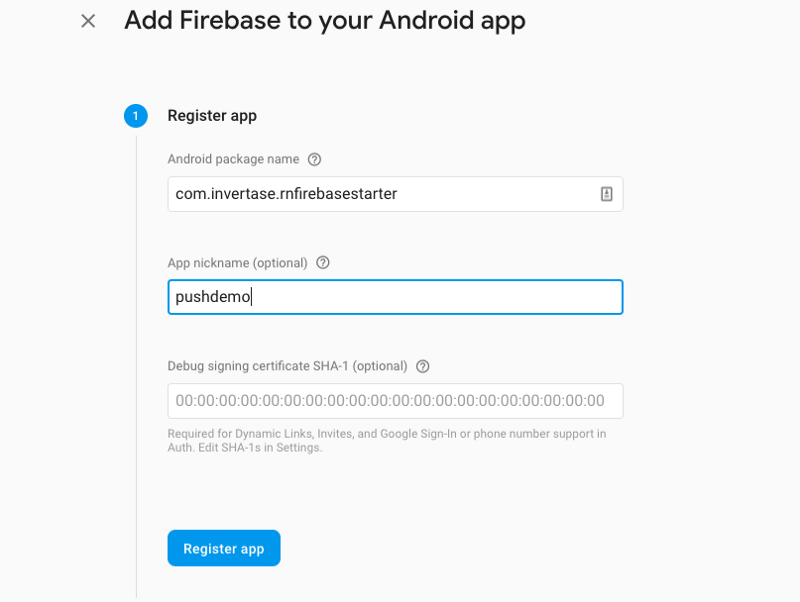
Here, we need to register the firebase to your Android application as shown screenshot below:
 After downloading the
 google-services.json file into your own project folder, we need to move the file from the main project folder into the project’s app folder. 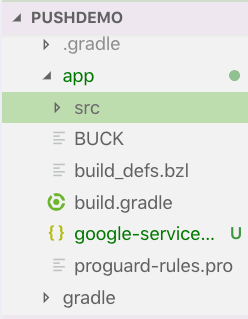
Then, we start the app/project using the command below:
react-native run-android
You should be able to see the following app in your Android emulator: 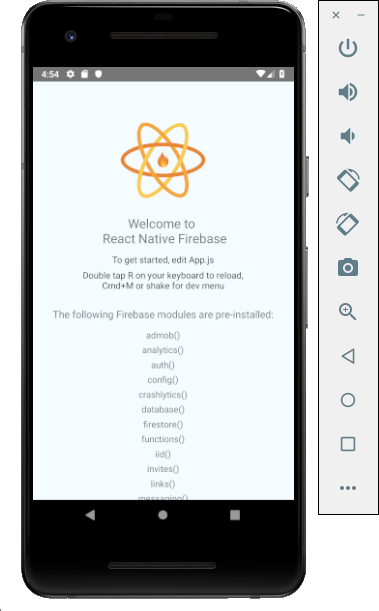
Storing Push Notifications Tokens in Firebase Database
For this step, we need to send a permission request to a user device to allow push notifications and retrieving the push token. If the user grants the permission, we store the retrieved token into Firebase real-time database. At first, we need to check if the user already allowed push permission before. To store the token, we are using the following code snippet:
firebase.messaging().hasPermission()
  .then(enabled => {
    if (enabled) {
      alert('Yes')
    } else {
      alert('No')
    }
  });
This shows you an alert with yes or no, depending on whether the push notifications permission is allowed or not. 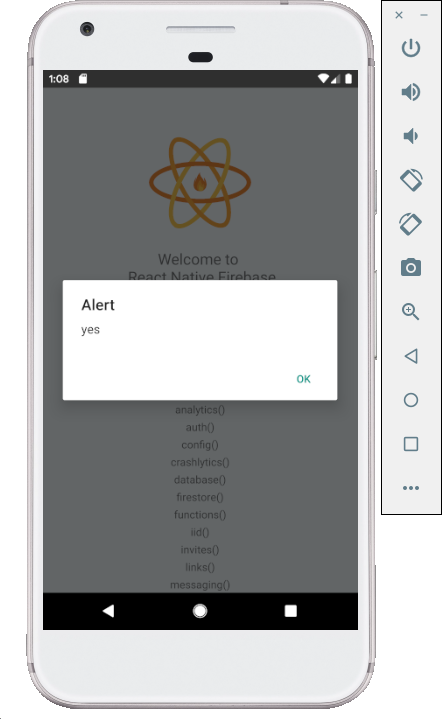
Fortunately, the permissions for push notifications is YES by default, on Android platforms, so you only need to ask for explicit permissions only on iOS.
Retrieving the Push Notifications Token
Leveraging the Firebase React Native package, we get the fcmToken from the Firebase SDK, by using the following piece of code:
firebase.messaging().getToken()
  .then(fcmToken => {
    if (fcmToken) {
      // user has a device token
    } else {
      // user doesn't have a device token yet
    }
  });
The token is shown in the alert box illustrated by the emulator screenshot below: 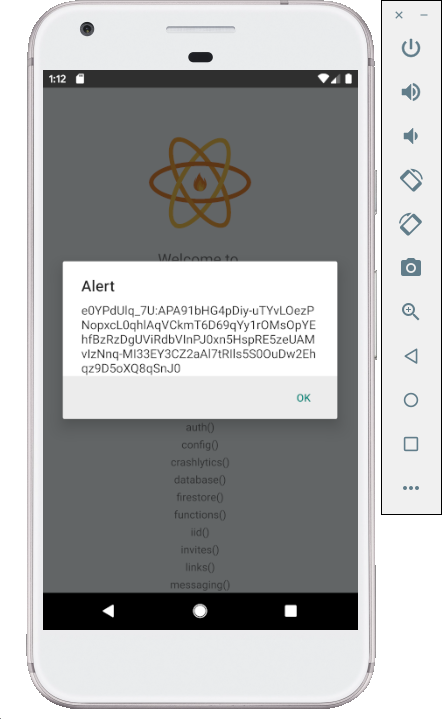
Now, let’s perform a quick test on the Firebase console, to see if this works. 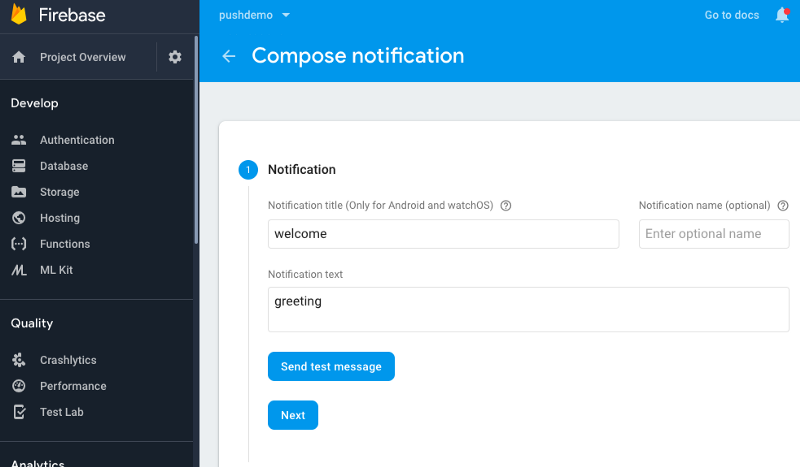
We want to send a push notification to the retrieved push token. So, paste the token into the “Add an FCM registration token” field, as shown in the screenshot below: 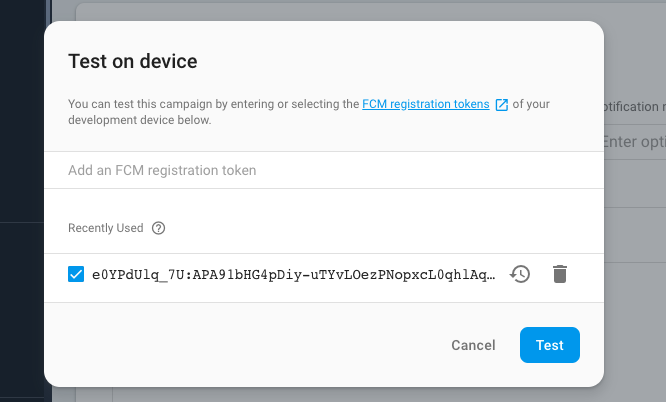
Now click on the Test button to test that the push notification shows up in your emulator: 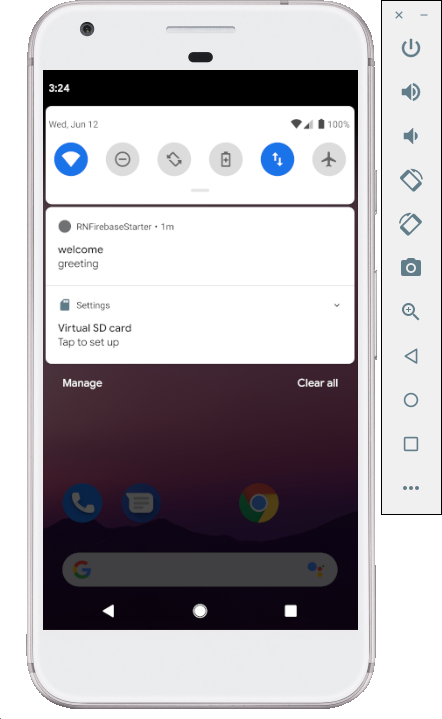
Notes:
- You need a Google Account in order to retrieve push notifications on an Android emulator.
- You cannot send push notifications to iOS Simulators. You can only send push notifications to iOS real devices.
Saving the Push Token to Firebase Database
Assuming that the user has successfully registered for push notifications, and therefor we have a valid push token, let’s store it into the database, so that it can be used later. To achieve this, we perform the following tasks:
- Check if permissions are already granted.
- Store the user data and token to database.
All the logic is shown in the code snippet below, in the asynchronous function componentDidMount():
async componentDidMount() {

    const enabled = await firebase.messaging().hasPermission();
    if (enabled) {
      firebase
        .messaging()
        .getToken()
        .then(fcmToken => {
          if (fcmToken) {
            console.log(fcmToken);
            firebase
              .database()
              .ref("/users/" + Math.floor(Math.random() * Math.floor(1000)))
              .set({
                email: "[email protected]",
                notification_token: fcmToken,
                created_at: Date.now(),
              })
              .then(res => {
                console.log(res);
              });
          } else {
          alert("user doesn't have a device token yet");
          }
        });
    } else {
      alert("no");
    }
  }
As you can see, we hardcoded the user data, since this is just a starter project, to get things running successfully. We then save the push token into Firebase real-time database, as shown in the screenshot below: 
Triggering Push Notifications with Firebase Cloud function
Let’s assume now that for each new user, you want to trigger a push notification to welcome them into your app. We can achieve this by creating a Cloud function. So, enable support for cloud functions by following follow this guide. Then, in index.js file in your project, we need to paste the code provided in the code snippet below:
const functions = require("firebase-functions");
const admin = require("firebase-admin");
admin.initializeApp(functions.config().firebase);
exports.sendPushNotification = functions.database
  .ref("users/{userID}")
  .onCreate(event => {
    const data = event._data;
    payload = {
      notification: {
        title: "Welcome",
        body: "thank for installed our app",
      },
    };
    admin
      .messaging()
      .sendToDevice(data.notification_token, payload)
      .then(function(response) {
        console.log("Notification sent successfully:", response);
      })
      .catch(function(error) {
        console.log("Notification sent failed:", error);
      });
  });
Here, we have created a function that triggers whenever users have added a new node and have newly inserted data. When this happens, we send a push notification to the user. Once you create that function, you need to run firebase deploy to send your function to the cloud. After this, you will see following instructions in your IDE terminal window: 
Now, let’s run your app on a hardware device as shown in the screenshot below: 
As you can see, we got the first notification. Congratulations! You’ve just implemented push notifications in React Native using Firebase. Nice going!
Summary
Push notifications are a great growth retention lever, so you need to take advantage of them in order to develop a successful mobile app. Fortunately, NPM packages such as RNFirebase are available, to make this task easier in React Native. In this tutorial, we learned how to setup Firebase Push Notifications on Android and how to trigger them. This tutorial also included the process of how to use the Firebase real-time Database to store the push token, and then trigger messages with cloud functions. If you enjoyed our tutorial on React Native push notifications, please share it with your friends. Happy coding!
Next Steps
Now that you have learned about resources to learn React Native development, here are some other topics you can look into
- Firebase — Push notifications | Firebase storage
- How To in React Native — Getting start |WebView | Gradient| Camera| Adding GIF| Google Maps | Redux | Debugging | Hooks| Dark mode | Deep-link | GraphQL | AsyncStorage | Offline |Chart | Walkthrough | Geolocation | Tinder swipe | App icon | REST API
- Payments — Apple Pay | Stripe
- Authentication — Google Login| Facebook login | Phone Auth |
- Best Resource – App idea | Podcast | Newsletter| App template
If you need a base to start your next React Native app, you can make your next awesome app using many React Native template.

1 Comment
sankar r · August 13, 2021 at 5:35 am
Hi I tried your tutorial. It works perfectly. But the notification receives only when the app is in background. How to receive the push notification even when the app is in foreground.