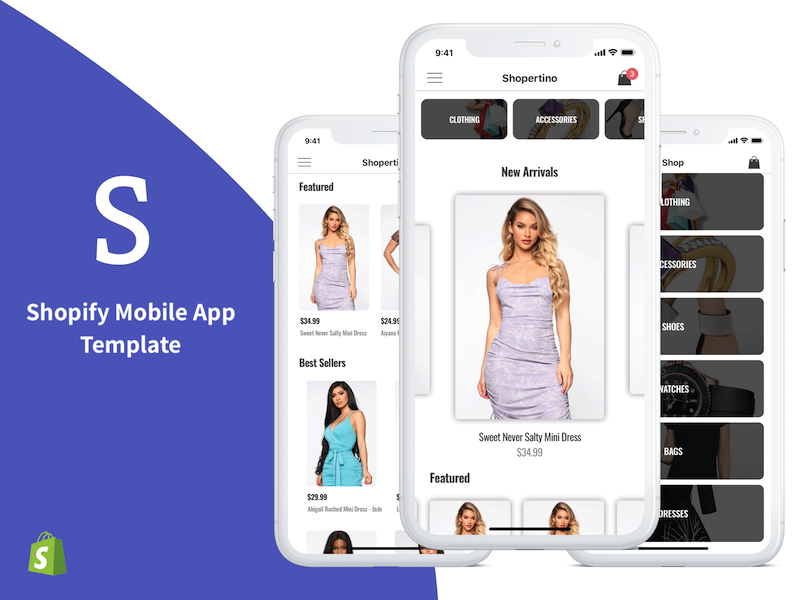
Turning any Shopify Store into a mobile native app is extremely easy with your gorgeous React Native Shopify template. In this article, we are going to describe in details, each step that’s required to get the app template integrated with your own Shopify online storefront.
On a high-level, here’s an overview of what you need to do in order to have your app ready to be published to App Store (iOS) and Google Play Store (Android):
- Link your Shopify store to the downloaded app template (by changing two API Keys)
- Choose Your Checkout Method
- (Optional) Create & link your own Stripe account (used for mobile payments, including Credit Cards, Apple Pay and Android Pay), if you chose the native checkout method
- Run the app on Android
- Run the app on iOS
None of the steps above require any coding experience. Everything is fully explained in details, in order to help non-coders convert their Shopify store into a mobile app without difficulties.
1. Link your own Shopify store
This is the most important step of setting up the mobile app to convert your Shopify store into a native e-commerce mobile app. In this step, you need to link your Shopify website to the React Native app template, so that your categories & products get displayed within the app. To achieve this, you need to do a couple of different things.
Shopify Integration contains the following features:
- Customers are directly registered with your Shopify website. This means, any website customer can easily log into the mobile app with the same account credentials
- All products and categories displayed in the mobile app are automatically synced with your website
- All orders placed via the app are visible in your Shopify dashboard
- All orders placed via the website, are visible to customers if they log into the website, and viceversa.
2.1 Generate an access token for your Shopify storefront
You will need an access token to access your Shopify store from your new mobile app. Generating an access token for your Shopify storefront can be simplified into three simple steps:
1. Login to your Shopify admin dashboard of the store you want to connect.
2. Create an App in Shopify to serve as a middleware by filling a simple short form.
3. Copy the generated storefront access token after successfully creating an App.
To achieve these simple steps, follow the detailed steps bellow:
2.1.1 From your Shopify admin dashboard, at the left menu list, go to Apps.
2.1.2 Click Manage private apps, near the bottom of the page.
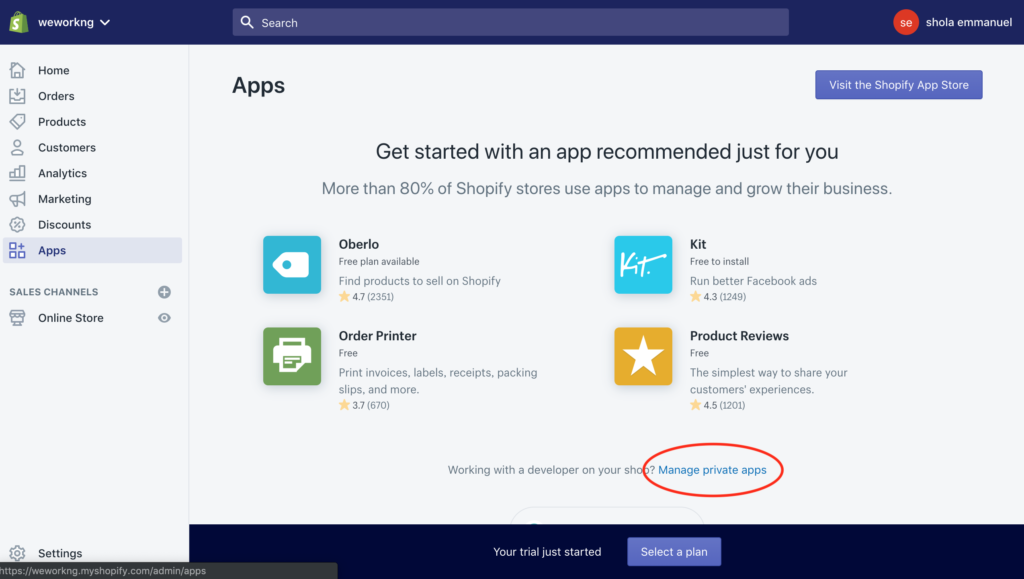
2.1.3 Click Create a new private app.
2.1.4 In the App Details section, enter a name for the private app and a contact email address. (Shopify uses the email address to contact the developer if there is an issue with the private app, such as when an API change might break it).
2.1.5 In the Admin API section, select the areas of your store that you want the app to be able to access.
2.1.6 Make sure you select **ALLOW** app to access your Storefront data.
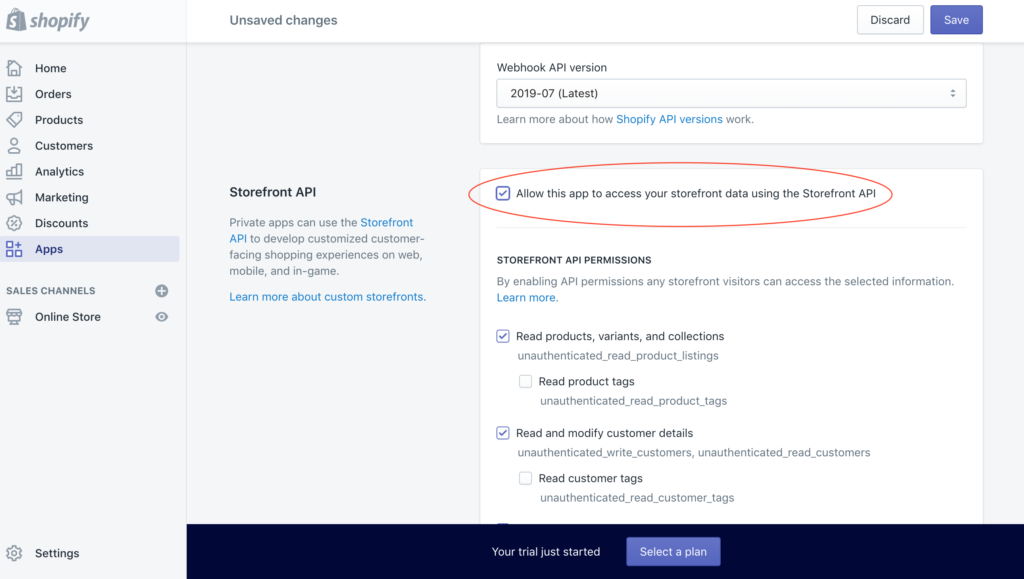
2.1.7 In the Storefront API permissions section, select which types of data you want to expose to the app.
2.1.8 Now click Save, and your storefront access token will be created.
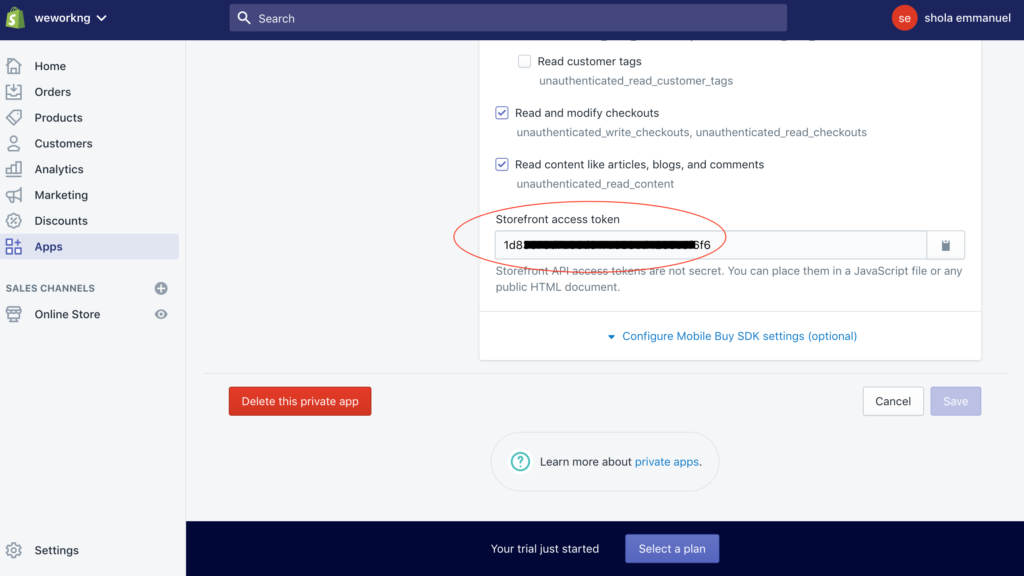
After your access token has been created successfully, you will be routed to a page with different sections:
- App Details.
- Admin API.
- Storefront API.
Scroll to the bottom to see and copy the newly created Storefront access token. Copy this token to your clipboard.
2.2 Update the Storefront Token & Shopify Store URL in the React Native code
Now that you have a storefront token, we need to add it into the app. Simply open the src/ShopertinoConfig.js file and override the Shopify configuration with your own store data:
shopifyConfig: {
  domain: 'your_store.myshopify.com',
  storefrontAccessToken: 'accessTokencb72e4222c9b90332662fa39e93f',
  apiKey: 'apiKey123121',
  password: 'your_password',
},
3. Choose Your Checkout Method
Our Shopify app supports two types of checkout:
- Shopify Webview
- In this case, when the customer wants to place an order, the app opens your Shopify checkout web page in a web view. Then, they can make the payment and place the order just like they do on your website. The payment goes directly into your Shopify web store, just like it does for the website checkouts, being a webview flow.
- One click orders with Apple Pay and Android Pay are not available for this method, since the payment is done via a webview, and not natively.
- Stripe Payments
- This uses Stripe for processing payments, and it’s done natively, directly in the React Native app (no webview)
- This supports one click orders with Apple Pay and Android Pay, since everything is done fully natively.
- The money goes into your Stripe account, and the orders will also show up in your Shopify dashboard.
In order to choose the right checkout method you’re interested in, simply open src/ShopertinoConfig.js and set the value of isStripeCheckoutEnabled flag to:
- true – this enables native Stripe Payments. For this to work, you also need to set up Stripe first, by following all the steps on how to set up Stripe.
- false – this enables Shopify Webview, deferring payment processing to your website
4. Running on Android
All you need to do to run our app templates on Android, is simply open an Android emulator (or plug in a device) and run
npm install && react-native run-android
If this is the first time you are running an app, check out our detailed tutorial on how to run React Native apps on Android, which includes dev environment setup too.
5. Running on iOS
Make sure you installed the npm packages first (“npm install“). Most of our React Native templates use advanced npm packages, such as Firebase or Facebook SDKs, which need to be linked – that’s to say the app is ejected, which means it doesn’t work with Expo nor can it simply be run by executing “react-native run-ios“.
To run apps on iOS, you need a MacOS computer. Unfortunately, for Windows users, you’ll have to either get an Apple computer, or install a virtual machine on your laptop.
To create an e-commerce app for iOS, from our premium app template, you need to install Cocoapods and Xcode first.
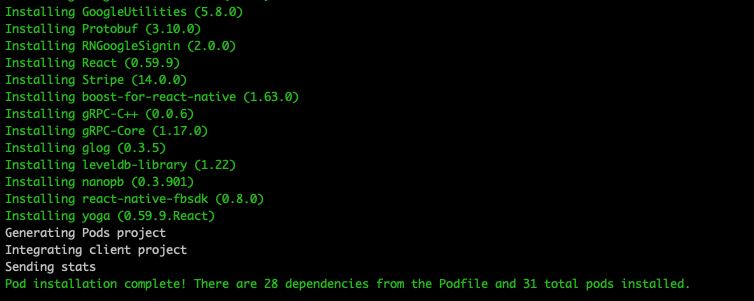
Open up your Terminal in the project’s directory, and switch to the ios subfolder to install the pods by executing:
cd ios && pod install
This will install all the dependencies our iOS mobile app template relies on. Your output should look like this:
Now, under the ios folder, there’s a file named Shopertino.xcworkspace. Open it in Xcode, and then run the app, by first choosing which device or simulator you want
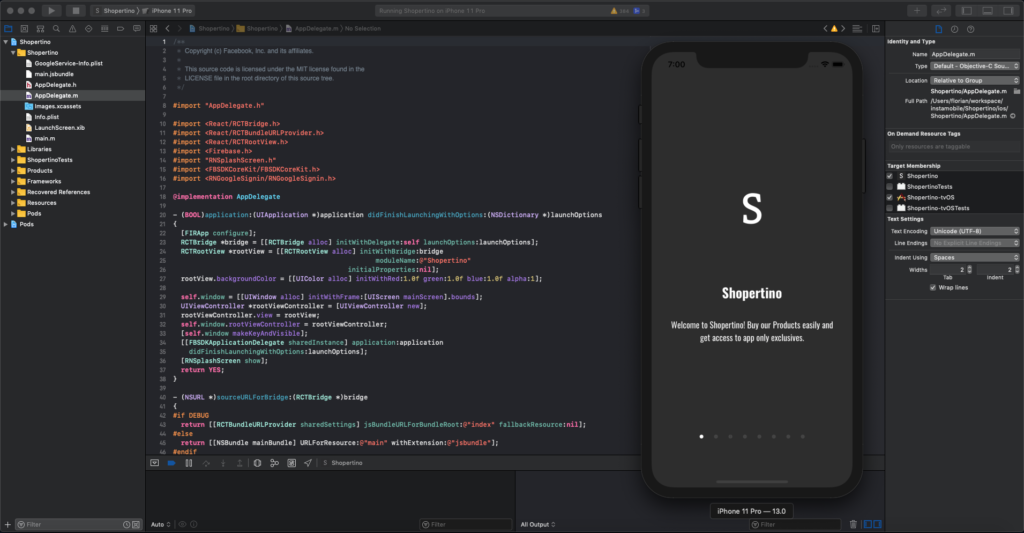
This would open up a metro bundler instance automatically. If it doesn’t start, simply run “npm start” in the Terminal to open it, and only after that, run the app in Xcode again. If you’re running into any other issues, you can debug them by using our React Native Errors documentation.